Using GNU Make To Build A TypeScript Project


In the last Make related article, we learned that GNU Make is really a build tool, not a task runner.
In this article, we will look at putting GNU Make to use in our project workflows. Quenk Technologies is mostly a Node.js shop, however most of the code written is in Typescript. That means each project usually has a build step where we convert TypeScript to regular JavaScript.
We use GNU Make to co-ordinate this.
Note: GNU Make is a complex beast and there is a lot left out here, some of it intentionally. I recommend anyone using the tool read the manual as the knowledge you can gain is invaluable when troubleshooting.
Requirements
To follow along you will need to have GNU Make installed on your machine. For Debian and Ubuntu derivatives, installation is as simple as running:
apt-get install build-essential
or the equivalent command for other mainstream Linux distros.
If running a Mac, which I have no experience with, you would probably have to use Xcode or homebrew to get the binaries.
Windows users may have luck with Cygwin, MinGW or Chocolately, all of which I have little experience with so your mileage may vary. When in doubt however, install Linux. ;)
The project we are building uses the browserify and the typescript programs so you would also need to them as well. I have provided a skeleton project here, just run npm install and they should be installed.
Writing Makefiles
In order for Make to know how to build your project, you need to place a file named "Makefile" or "makefile" in your project directory. This contains instructions for the Make program on how to build your project.
According to the GNU Make documentation; "Makefiles contain five kinds of things: explicit rules, implicit rules, variable definitions, directives, and comments". For the purposes of this post, we are interested in comments, variable definitions and explicit rules.
Comments
Comments are straightforward enough; any line beginning with a '#' is treated as a comment. They are especially useful for explaining variables and rules in large or complicated makefiles:
# This sets the path to our typescript compiler.
TSC:=./node_modules/.bin/typescript

# Convert the typescript sources into javascript.
lib: src
	$(TSC) --project src
Variables
A variable declaration is "a line that specifies a text string value for a variable that can be substituted into the text later". It is important to remember this; variables only contain text, so wherever you put them, imagine yourself typing out whatever it contains in its place.
Declaring a variable one=1 sets the value of the variable one to the text "1" not the number 1. Declaring list=[] sets the variable list to the text "[]", it does not create a new empty list or array.
From the manual:
A variable name may be any sequence of characters not containing ‘:’, ‘#’, ‘=’, or whitespace. Variable names are case-sensitive.
GNU make has two "flavors" of variables, recursive and non-recursive variables. Additionally, recursive variables have two "sub-flavors", the regular syntax and one for "simply expanded variables".
We will only be using the latter.
A simply expanded variable means you can safely use other variables in the value (text) part of the variable declaration.
To define a variable value, we write its name followed by the := (colon,equal) operator and the text value we want the variable to have. For example let's define the path to the browserify executable in a variable called "BUNDLER":
BUNDLER:=./node_modules/.bin/browserify
Later we can use the syntax $(BUNDLER) to avoid repeating the browserify path if desired. That's a dollar sign "$", followed by an opening parenthesis "(" the name of the variable and a closing parenthesis ")".
Remember that the contents of variables are just text, not objects, not numbers, text. They also do not have to get their value from a static source. If we wanted for example, to store a list of files in our src directory we could utilize one of Make's builtin functions and the find utility.
That function is the shell function.
Functions
Make has a set of builtin functions that can be used to preform actions the come up often when dealing with makefiles. The syntax of function usage is similar to that of variables; dollar sign followed by the name in parenthesis, except functions can also take one or more arguments separated by a comma:
LIST_OF_FILES:=$(shell find src -type f)
The above example uses the shell function which takes one parameter, the shell command to run, and will be replaced with whatever the output of the command is. In this case, it will be a listing of files.
The syntax for arguments can seem a bit strange compared to what we are accustomed to in general purpose programming languages but remember, function arguments are also just text.
Some other useful builtin functions include subst and foreach.
The subst function can be used to change the occurrence of a sequence of characters to another sequence. For example, let's say you need to convert absolute paths to relative paths for a node module:
ABS_PATHS:=/home/user/file1 /home/user/file2 /home/user/file3
REL_PATHS:=$(subst /home/user,.,$(ABS_PATHS))
The above will set the text of REL_PATHS to "./file1 ./file2 ./file3".
The foreach function lets you repeat the expansion of some text for every whitespace separated word in some text:
NOISE:=$(foreach var,one two three,n-$(var))
The above will set the text of NOISE to "n-one n-two n-three".
Note that when specifying the arguments to a function, whitespace after a comma will be treated as part of your argument. It is not ignored.
For larger project builds, the builtin functions can prove invaluable. More information is available in the functions section of the manual.
Rules
GNU Make has explicit rules and implicit rules. We will only focus on the explicit ones here. Rules are the meat of a Makefile and are what is actually used to both determine what needs to be built and how to do it. A single rule consists of 3 parts:
- The target.
- The prerequisites
- The recipe.
<target> : <prerequisites>
<TAB> <recipe>
The target part of a rule indicates the file or directory the rule's recipe will create. Prerequisites, refers to files, directories and other targets that must exist or be completed before the target is built. You can think of them as dependencies.
The recipe part is where you write the shell code that gets executed to bring your target into existence.
Thinking back to our acyclic graph realization elsewhere, targets are the vertices of our graph; the goals we want to achieve. Edges are a bit more abstract but could roughly be seen as the recipes combined with the parent prerequisites.
By default, Make starts working on the first target in our file, this is referred to as the default goal. We can use that fact to our advantage to list our rules in an order that preserves our graph.
If you have ever worked with the Flex/Bison parser generator family, this structure may seem familiar to you.
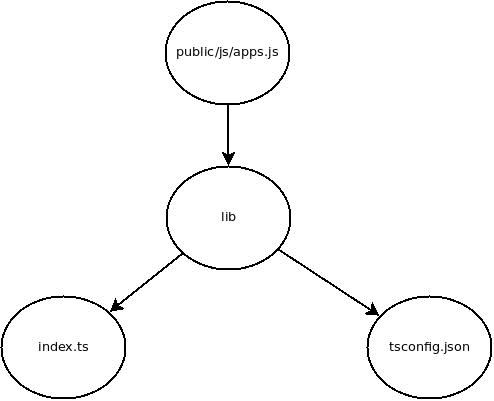
Our first rule should be the final result of building our project. Using our Node.js project example we may write the following:
public/js/app.js: lib
	./node_modules/.bin/browserify lib/index.js > $@
This rule creates the target file public/js/app.js. We run browserify on our lib/index.js file and redirect the output to our target file. The $@ is one of Make's automatic variables that can be read about here.
Automatic variables are available in the recipe section of a rule and contain information that we may find useful when crafting our recipes. The $@ variable provides the target name for the current rule.
In our example project, we need don't actually write any JavaScript by hand, instead, we code in TypeScript. This needs to be turned into regular JavaScript (ECMAScript) so that browsers can actually interpret our code. We use the typescript compiler tsc for this which thankfully can be run from the CLI.
We can therefore say that our browserify bundle "depends" on our source code being compiled via tsc. We can go on to further say that compilation of our source code "depends" on the existence of our source files. Let's turn that into a Make rule:
# We copy our sources to the lib folder and compile in place.
lib: src/index.ts src/tsconfig.json
	@rm -R lib || true
	cp -R src lib
	./node_modules/.bin/tsc --project $@
In this case we only need one rule to represent the dependencies. In the above we have told Make that our lib directory depends on a file located at src/index.ts and src/tsconfig.json existing.
If we combine this with the previous rules, we get a Makefile that accurately describes our dependency graph:
public/js/app.js: lib
	./node_modules/.bin/browserify lib/index.js > $@

lib: src/index.ts src/tsconfig.json
	@rm -R lib || true
	cp -R src lib
	./node_modules/.bin/tsc --project $@
When we run the command make in our project directory, Make will figure out what needs to be built and which recipes to execute.
This Makefile assumes the following directories exist:
public/jssrc
Of course we could easily write our recipes to check for their presence if and create them if desired.
How Make Executes
Now that we have created a Makefile, let's think a bit about how Make executes. The manual describes Make as executing in two main steps, first it builds a dependency graph from the rules we give it, figuring out what needs to be built and what does not. It then executes the recipes that need to be.
How does Make know what needs to be built? We can assume that if a target file or directory does not exist, then we know for sure that it needs to be built. However what if our files have been built but the dependencies have changed since then?
How would Make know what to do?
The answer is simple and clever; Make looks at the modification times of targets and prerequisites. If the modification time of a target is earlier than any of its prerequisites then it means the target is stale and needs to be rebuilt.
Nice!
That means that running make repeatedly on a project will only build the project if it needs to, provided the rules form an accurate dependency graph. That means we can configure our editor or IDE to simply run make each time we save a file and not have to worry about unnecessary rebuilds!
For small projects this may not seem like much of a big deal but when you have multiple build steps in a project (compile typescript, build less, compress images, generate code from templates etc.), this can save on time spent waiting for the entire project to be rebuilt.
Make allows us to design incremental builds.
Another benefit to treating our targets as a graph, is that you can safely execute build targets in parallel using the -j flag. You see, once Make can properly understand our dependency graph, it can figure out what can be run in parallel without breaking things.
The second part of Make's execution is of course the actual execution of our recipe code. For all intents an purposes, recipes are just code written in the syntax of the Bourne Shell. We can interpolate Make variables, functions and custom macros to avoid repeating ourselves but all we are doing is generating the text that will be executed in a shell.
That's it!
We now know enough to write a well structured Makefile and run make without hesitation. As mentioned at the top, there are more features to Make than this and there are also some caveats to be aware of as you come to use it more.
As with most things in software, documentation is your friend and I really do encourage reading the manual at least once. It's worth it!
Have fun making things.